
Quick answer: Turn off power at the breaker, support the lens with one hand, then look for the release style: wraparound lenses flex off side tabs, framed prismatic lenses unlatch and swing down, troffer panels lift and tilt out of the ceiling grid, and sliding lenses must shift toward one end (often after removing an end cap). If it won’t move, push the lens slightly upward first to reduce clip tension.

Safety first: power off, ladder setup, and protection
Before you touch the diffuser lens, turn the light off at the switch, then shut off power at the circuit breaker. Even though you’re removing the cover (not wiring), fluorescent fixtures often expose sharp metal edges and fragile plastic.
- Use a stable ladder tall enough that your chest is near fixture height (avoid overreaching).
- Wear gloves to protect from sharp edges and brittle plastic shards.
- Support the lens with one hand while releasing clips with the other covers can drop suddenly.
- Work slowly in cold rooms: plastic diffusers can be more brittle in low temperatures.
If you’re not repairing the fixture and simply want better brightness without opening ceilings or running cables, see: how to add lighting to a room without wiring.
Identify your fluorescent light cover type (30-second check)
Most “how do I remove this fluorescent light cover?” problems happen because the release method depends on the lens design. Use these quick identifiers to pick the right steps.
Common diffuser lens types (and how they release)
- Plastic wraparound lens (curved “tube” or “U” shape): typically held by side tabs that release when you push up and flex one edge down.
- Framed prismatic lens (flat panel in a metal frame): usually hinges or latches on the long side; it swings down like a door.
- Troffer / drop-ceiling lens (office grid ceiling): the diffuser often lifts and tilts out of the T-bar grid.
- Sliding lens with end caps: the cover must slide toward one end; sometimes you remove an end cap first.
Cover-type cheat sheet
| Cover type (entity) | What you’ll see/feel | How it releases | Most common mistake |
|---|---|---|---|
| Wraparound diffuser lens | Curved plastic; tabs or spring clips on long sides | Push up slightly, press tab/clip, flex one edge down | Pulling straight down and cracking the lens |
| Framed prismatic lens | Flat “crystal” panel inside a metal frame | Unlatch levers/clips; frame swings down (hinged) | Trying to flex it like a wraparound cover |
| Troffer panel (drop ceiling) | Panel sitting in ceiling grid (T-bar) | Lift up, tilt corner down, rotate out | Forcing it down without lifting first |
| Sliding lens + end caps | End cap seam; lens sits under a return lip/channel | Remove end cap (if present) and slide lens toward one end | Pulling down when it must slide |
Pro tip: Stand slightly to the side and look along the length of the fixture. You’re searching for a clue: a small spring clip, a lip/channel that the lens slides under, or a seam where an end cap can be popped off.
How to remove a plastic wraparound fluorescent cover
A wraparound diffuser is the most common home garage/laundry style: a curved plastic lens that snaps into the fixture. It usually releases by flexing one edge off the tabs.
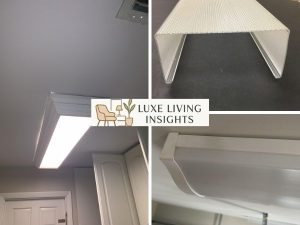
Steps
- Support the lens with your non-dominant hand so it doesn’t drop.
- Push the lens upward slightly (toward the fixture). This reduces pressure on the tabs and makes release easier.
- Find the tabs/clips along the long side or near the ends. They may look like small plastic “fingers” or metal spring clips.
- Release one side first: gently squeeze or press the tab inward/outward (depends on model) while pulling the lens edge down.
- Once one side is free, let it hang or remove fully by guiding the other side out of the channel.
Common mistakes
- Pulling straight down hard (this cracks brittle plastic).
- Bending tabs too far (tabs snap and the lens won’t reattach securely).
- Twisting the lens instead of flexing one edge off at a time.
If your diffuser lens is yellowed or cracked, you can replace it—but consider whether the whole fixture should be upgraded to LED for better light quality. (If you’re redecorating a utility space, you might also enjoy a style refresh like what is scandinavian design to guide cleaner, brighter lighting choices.)
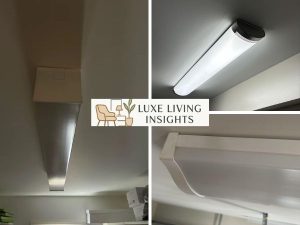
How to remove a framed prismatic diffuser lens (metal frame)
Many kitchen, hallway, and office-style fluorescent fixtures use a flat prismatic panel inside a metal frame. Instead of snapping off, the frame typically unlatches and swings down.
- Place one hand under the frame to support the panel.
- Locate the latches (often on one long side) or spring clips at the corners. They may look like small metal levers or tabs.
- Release the latch(es) one at a time while supporting the frame. The diffuser will usually drop down on a hinge.
- If you need the frame fully off, look for a hinge pin or a slot where the frame lifts up and out.
- Lower the frame slowly, keeping it level—flat diffusers crack when bent.
Once open, you can safely access fluorescent tubes or internal components. If you’re pairing overhead lighting with furniture layouts, scale matters—especially above dining areas. This sizing reference can help avoid lighting that feels too small or too harsh: Dining Table Sizes for 6, 8, 10 & 12.
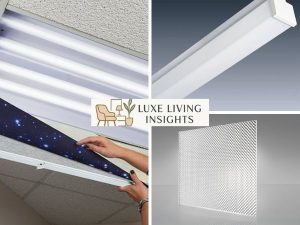
How to remove a troffer or drop-ceiling fluorescent lens
In offices and some finished basements, fluorescent lights sit above a suspended ceiling grid (T-bar). The diffuser may be a flat panel or prismatic lens that rests in the grid.
- Stand under one edge and lift the panel upward carefully.
- Angle/tilt one corner down so it clears the grid opening.
- Rotate the panel slightly and remove it through the opening.
- Set it down on a flat surface to avoid warping.
If your goal is a softer, less “office” vibe, swapping harsh overhead light for layered lighting and warm materials can transform the room. Natural textures (like rattan/wicker) work especially well with warm bulbs: wicker vs rattan vs cane.
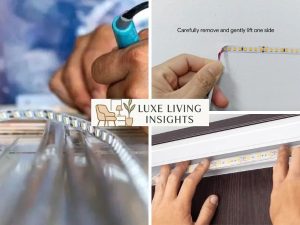
How to remove a sliding diffuser lens (end-cap method)
Some fluorescent fixtures use a lens that doesn’t flex off tabs. Instead, it sits under a lip and must slide toward one end. If you pull down, it won’t move—and that’s when covers crack.
- Look for a stopper or seam at one end (an end cap).
- If the end cap is removable, gently pop it off using your fingers first. If needed, use a plastic tool (or a putty knife wrapped in a cloth) to avoid scratches.
- Once the end is open, slide the diffuser lens toward that side until it clears the opposite lip.
- Lower the lens slowly and keep it straight to prevent cracking.
Sliding lenses are common in older garage fixtures. If you’re furnishing a multipurpose space that includes a dining nook or fold-away table, flexible lighting matters too—this guide can help with space planning: best folding dining table and chairs for small spaces.
If your fluorescent light cover is stuck? fixes that prevent cracking
When a diffuser lens won’t budge, the issue is usually paint, grime buildup, warped plastic, or tabs fused in place over time. Use these low-risk steps before you apply force.
1) Reduce pressure first
Push the lens up toward the fixture before you try to release tabs. This unloads the clip tension and often makes the next step easy.
2) Find the real release point
Run your fingers along the sides/ends to locate clips. If you can’t find any, assume it may be a sliding/end-cap style and check the ends again.
3) Use a wrapped putty knife (carefully)
If a clip is stubborn, use a putty knife wrapped in a thin cloth to gently pry the clip—not the lens. Work in tiny movements and stop if you hear creaking (that’s plastic stress).
4) Warm the room slightly for brittle plastic
Cold diffusers crack more easily. If safe and practical, warm the room a little before you try again. (Avoid heat guns; uneven heat can warp the lens.)
5) Replace broken tabs instead of forcing a “perfect fit”
If tabs snap, the diffuser may not seat correctly and can rattle. At that point, replacing the lens or fixture is often more reliable than improvising. And if you’re improving the overall comfort of a room (not just fixing one ceiling light), consider how seating and lighting work together. A well-placed lamp plus the right chair can do more for ambiance than another overhead fixture: Best chairs for living room with sofa.
FAQs
Why doesn’t my fluorescent light cover have screws?
- Many fluorescent diffuser lenses are designed to be tool-free for quick tube access, using snap tabs, spring clips, hinges, or a sliding lip system. If you don’t see screws, you likely have a tab/clip or sliding-end design.
How do I know if it’s wraparound or sliding?
- Wraparound lenses usually look curved and “hug” the fixture; they flex off one side. Sliding lenses often sit flatter and feel locked under a lip—check for end caps and try sliding before pulling down.
What if the plastic diffuser is yellow and brittle?
- Yellowing often indicates age and UV exposure. Handle gently, support the lens with both hands, and consider replacing the diffuser (or the whole fixture) if tabs keep cracking.
Can I remove the cover with the light switch off (without flipping the breaker)?
- For best safety, use the breaker. Some fixtures can still have energized components even when the wall switch is off, depending on wiring and circuits.
What if I’m upgrading the room and want a calmer feel than fluorescent lighting?
- Layering light (table lamps, floor lamps, sconces) and choosing warm, natural textures can soften the look dramatically. You can also explore a calming layout philosophy like feng shui desk placement in home office or room-specific refresh ideas such as feng shui bathroom decorating ideas.
Should I clean the diffuser before reinstalling it?
- Yes. Dust and film reduce brightness and make light look dingy. Clean with mild soap and water, rinse well, and dry completely before reinstalling to avoid streaks.
How do I reinstall the fluorescent light cover?
- Reverse the method you used: align one side into the channel or lip, then flex/snap the other side into tabs. For sliding lenses, slide back into the lip until it seats fully. Avoid forcing it—misalignment is the most common reason tabs break.
Is it worth replacing fluorescent fixtures entirely?
- If the diffuser is cracking, the fixture hums, or the light quality feels harsh, upgrading can improve comfort and reduce maintenance. You can still keep the style cohesive with natural materials and softer palettes especially if your home leans toward Scandinavian or organic-modern aesthetics.
Related reading (if you’re refreshing the room’s lighting)
- If you want more light without opening ceilings or adding new wiring:how to add lighting to a room without wiring
- Planning a dining space where ceiling lighting scale matters:Dining Table Sizes for 6, 8, 10 & 12
- Small-space layout ideas if your fluorescent fixture is in a multipurpose room:best folding dining table and chairs for small spaces
- If you’re choosing softer décor materials to balance bright overhead lighting:wicker vs rattan vs cane and Rattan Wicker outdoor furniture
- Styling reads that pair well with calmer, layered lighting:what is scandinavian design and Best chairs for living room with sofa
Articles on the same topic:
-

When Were Chandeliers Invented? A Deep History of Luxury Lighting
-
How to Take LED Lights Off the Wall Without Damaging Your Walls
-

What Size Pendant Light for Living Room? Dimensions Height Guide
-

Outdoor Covered Patio Lighting Ideas That Actually Work
-

How Many Pendant Lights Over a 5 Foot Island? The Definitive Spacing & Sizing Guide
-

Set the Perfect Chandelier Height Above Dining Table: Inches, Ceiling Rules & Sightlines