If you’re searching for the right distance from the wall for an over-sink pendant, you’re really solving one problem: Where should the light land so the basin is bright, your sightline stays comfortable, and the fixture looks intentional?
Do you really need to measure wall setback for a pendant over the kitchen sink?
Yes! you should measure wall setback for an over-sink pendant because it improves task-light accuracy, reduces shadows in the basin, and keeps the fixture visually balanced instead of feeling jammed against the wall.
To connect this to everyday use at the sink, next we’ll look at the two most common problems wall setback solves: shadows where you work and “false centering” that looks right but lights wrong.
Will the wrong wall setback create shadows on the sink and countertop?
Yes! the wrong wall setback can create shadows because your body and faucet block the beam, the light lands behind the basin, and the work zone becomes dim where you rinse, scrub, and prep.
Specifically, aim for light to fall into a practical “task rectangle”: the basin + the counter edge where you place dishes and tools.
- Your body is often the tallest object between bulb and basin—so poor setback = a darker bowl.
- High-arc faucets can add a secondary shadow line across the sink.
- A pendant placed too far back can leave the front counter edge under-lit.
Can a pendant be too close to the wall (and still look centered)?
Yes! a pendant can be too close to the wall even if it looks centered because visual centering doesn’t guarantee the shade’s centerline clears the wall plane, avoids backsplash glare, or lights the front half of the basin.
So, next, we’ll define “wall setback” precisely so you always measure it the same way.
What does “wall setback” mean for an over-sink pendant light?
Wall setback is the measured distance from the finished wall (or backsplash plane) to the pendant’s centerline, set so the light lands over the basin while the fixture stays visually aligned and comfortable.
Because this depends on where you measure from and what point counts, next we’ll lock in both reference points.
Where exactly do you measure from the wall, backsplash, or countertop edge?
Measure from the finished wall plane (or the front face of the backsplash if it’s the true visible wall surface), because that vertical plane is the stable reference that won’t change with countertop overhang or sink lip styles.
To keep your measurement consistent, always measure from the plane your eyes read as “the wall” when you stand at the sink.
- If the backsplash is flush and continuous, treat the tile face as the wall plane.
- Avoid measuring from the countertop edge unless you’re intentionally targeting counter-front illumination.
- If your backsplash is thick, note that depth—so your “wall” reference matches reality.
What point on the pendant counts the canopy, cord, or the center of the shade?
The point that counts is the pendant’s centerline—typically the center of the shade (and the light source), not the canopy edge or the cord, because the goal is where light falls, not where hardware sits.
Think: canopy = anchor, cord/rod = spine, shade center = aim point.
What is the best wall setback range for a pendant light over a kitchen sink?
There are 3 practical wall setback “ranges” tight-to-wall sinks, window sinks, and constrained cabinet layouts classified by what’s behind the sink and what would block light or sightlines.
To keep this actionable, next we’ll start with the most common setup: a sink tight to a wall.
What wall setback works best for a sink that sits tight to the wall?
For a sink that sits tight to the wall, the best wall setback is typically the sink-centered position that keeps the light over the basin; some guides recommend keeping the pendant centered over the sink and no more than about 6 inches from the wall plane to avoid awkward shadows.
The goal is not to “hug the wall,” but to keep the beam from landing behind the bowl especially when you’re standing at the sink.
- Center to the basin (task-first) or faucet (visual-first) choose intentionally.
- Wider shades may need slightly more clearance while staying basin-focused.
- Use a mockup test (later section) to confirm the landing point.
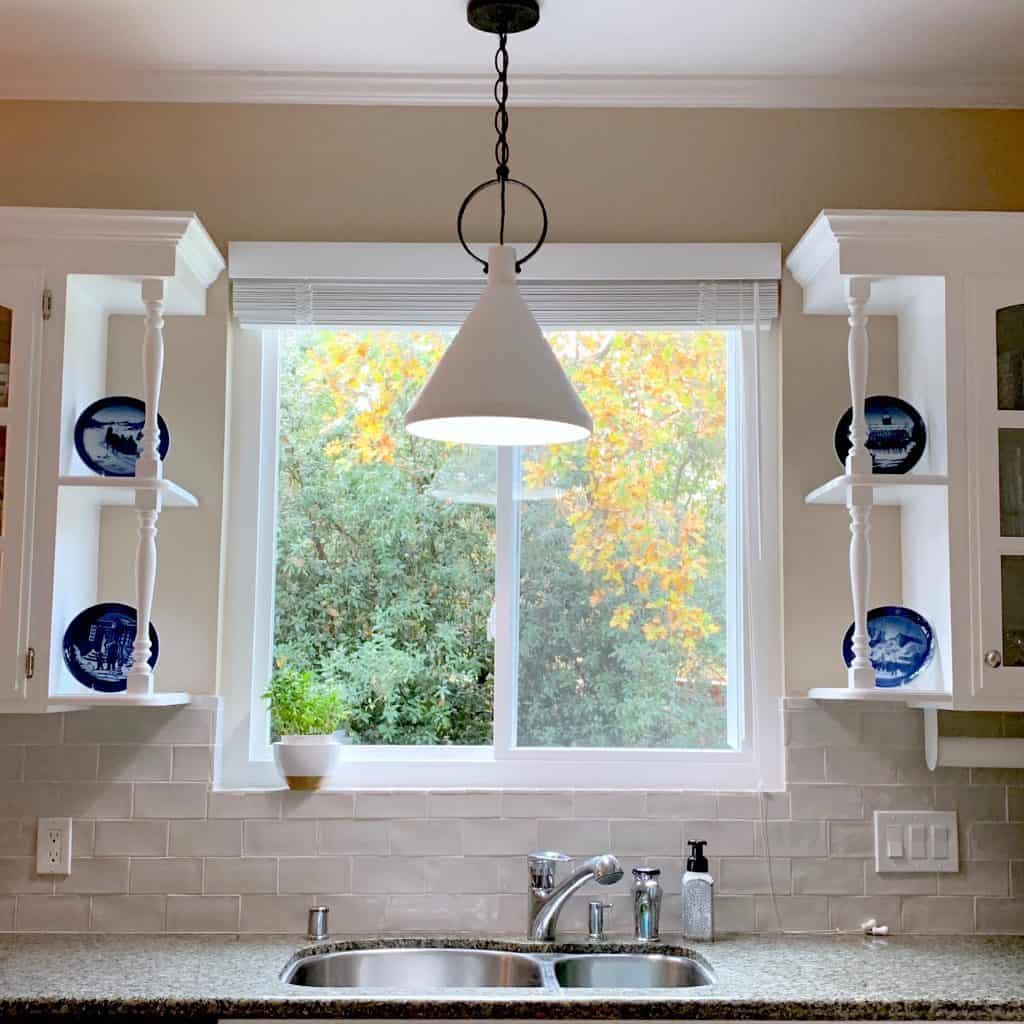
How should wall setback change if your sink is under a window?
A pendant wins on style, recessed lighting wins on preserving window views, and under-cabinet options win when you want task light with minimal visual interruption—so setback under a window should be more conservative and the fixture should stay visually light.
To choose confidently, next consider whether you want a statement or an unobstructed daylight experience.
- If you keep a pendant: choose a smaller shade and avoid heavy visual mass in the window plane.
- Prefer diffused or softly tinted glass to reduce harsh glare near eye level.
- Mock it up before drilling so you can evaluate sightlines from your normal stance.
How do you measure wall setback step by step (so the pendant lands over the basin)?
Use the centerline-and-transfer method in 6 steps find the sink centerline, set the landing point, transfer it to the ceiling, measure setback from the wall plane, mock it up, and mark the final junction point—so the pendant lights the basin cleanly.
To keep your install accurate, next we’ll start with the most important step: establishing the true centerline.
How do you find the sink centerline and transfer it to the ceiling accurately?
Find and transfer the sink centerline using a tape measure plus a plumb reference (laser or string line) so your ceiling mark sits directly above the basin’s midpoint—not just “visually centered” between cabinets.
Specifically, measure twice from fixed points and transfer once with a plumb reference.
- Measure the sink width and mark the midpoint on painter’s tape at the backsplash line.
- Confirm whether the faucet is centered; choose basin-centered (task-first) or faucet-centered (visual-first).
- Use a laser plumb or weighted string line to project the midpoint to the ceiling.
- Mark the ceiling point lightly in pencil for adjustments.
How do you sanity-check the setback before drilling (tape mockup test)?
Sanity-check your wall setback with a 3-part mockup—mark the ceiling point, hang a temporary line at the planned drop, and stand at the sink to confirm beam landing, glare, and clearance—before you drill anything.
- Stand at the sink: can you see the bulb directly? If yes, glare risk is high.
- Look into the basin: does the light fall inside the bowl, not behind it?
- Move as if washing: does the shade feel like a head-bump risk?
How do pendant height and wall setback work together over a sink?
Height helps reduce obstruction and widen spread, wall setback places the beam over the basin, and shade design controls glare—so the best over-sink setup balances all three rather than maximizing only one.
Because most homeowners start with height, next we’ll anchor the baseline rule and then show how setback affects comfort.
Is 30–40 inches above the countertop still the best rule over a sink?
Yes—30–40 inches from the countertop to the bottom of the pendant is a strong baseline because it preserves working clearance, keeps light close enough for tasks, and avoids overwhelming your sightline.
- Taller users often prefer slightly higher within the range.
- Larger shades may sit higher to reduce visual heaviness.
- If glare is a problem, raise slightly and use diffusion/dimming.
If you move the pendant closer to the wall, should you raise or lower it?
Raising helps reduce eye-level glare, lowering improves task focus, and staying mid-range works best with a diffused shade—so if you move closer to the wall, you’ll often raise slightly or choose a more shielded shade.
What pendant size and shade type prevent glare and awkward shadows at the sink?
There are 3 pendant variables that most directly prevent glare and awkward shadows: diameter, shade transparency, and beam direction—classified by how visible the bulb is from eye level.
To apply this easily, next match size to your sink first, then choose the shade style that’s comfortable to stand under.

What pendant diameter fits a standard sink vs a farmhouse sink?
There are 2 practical sizing targets: a standard sink usually suits a smaller pendant (often around 6 inches wide or a modest diameter), while a larger farmhouse sink can handle a larger shade (up to roughly 12 inches wide) to keep proportions balanced.
- If you lean in while washing, choose a size that won’t feel “in your face.”
- If uppers are nearby, smaller shades reduce visual crowding.
- When in doubt, prioritize clearance and comfort over “statement scale.”
Which shade is better at the sink: clear glass, opal glass, or metal?
Clear glass wins for maximum brightness, opal glass is best for soft glare control, and metal shades are strongest for concentrated downlight so diffused (opal/frosted) shades are often most comfortable for sink task lighting.
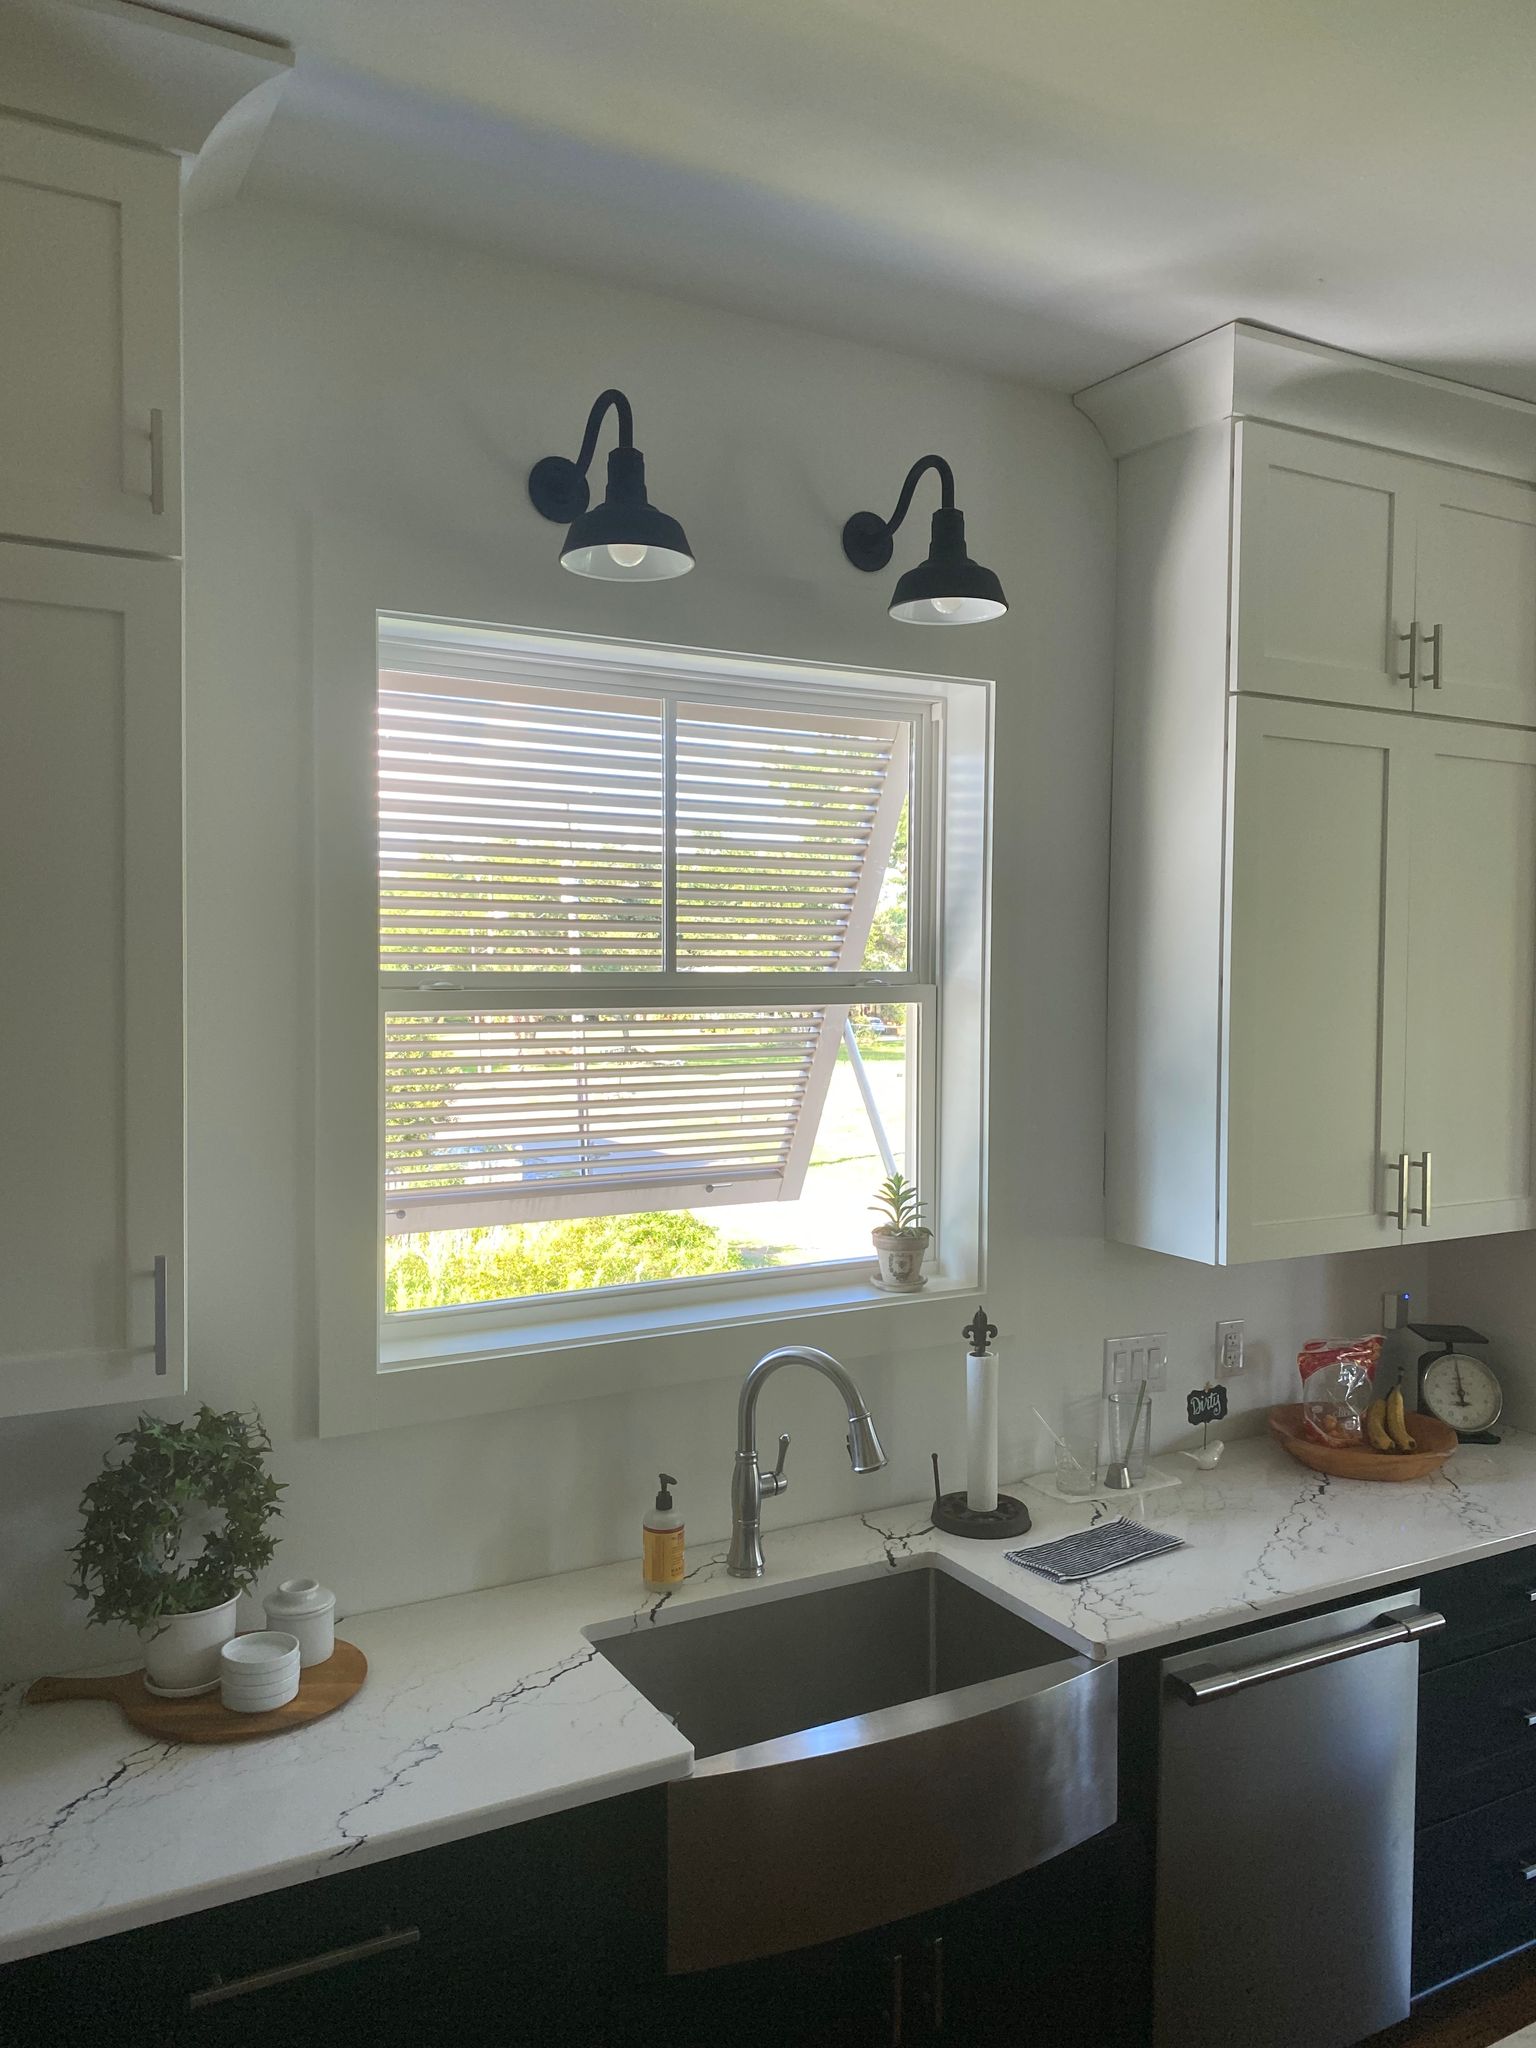
Can you use one pendant vs two pendants over a sink, and how does setback change?
One pendant wins for simplicity and clean sightlines, two pendants win for wider coverage over double sinks, and a single larger fixture can be a compromise so setback stays tied to the basin centerline, while spacing changes with fixture count.
To make the choice easy, next we’ll decide when one is better and how to place two without clutter.
When is a single pendant better than two over a double sink?
Yes—a single pendant is often better than two over a double sink because it reduces visual clutter, is easier to center for task lighting, and simplifies height/setback adjustments—especially if you already have good ambient lighting nearby.
- You want a clean, minimal look above the sink.
- A window/cabinet layout makes two pendants feel crowded.
- You can supplement with recessed or under-cabinet lighting.
If you install two pendants, what spacing and alignment keeps them balanced?
Balanced two-pendant placement means aligning each pendant to a basin (or evenly across the sink width) and spacing them far enough apart to avoid overlap glare while maintaining symmetry—so measure center-to-center for consistency.
- Use center-to-center spacing, not edge-to-edge.
- Keep both fixtures the same height and setback.
- Smaller pendants can sit slightly closer without looking crowded.
What are the most common wall-setback mistakes (and how do you fix them)?
There are 5 common wall-setback mistakes—too close to the wall, too far from the basin, centering to cabinets instead of the sink, glare from an exposed bulb, and being limited by an existing junction box—classified by whether they hurt function, aesthetics, or both.
To fix them quickly, next we’ll handle the hardest constraint first: a junction box that’s already in the wrong spot.
What if your junction box is already installed in the “wrong” spot?
A “wrong spot” junction box is a ceiling electrical point that doesn’t align with your sink centerline or ideal wall setback, forcing the pendant to hang off-target unless you adapt with approved hardware or reposition the box.
- Small offset: a larger canopy may visually cover minor misalignment (fixture-dependent).
- Moderate offset: manufacturer-approved adapters can help in some installations.
- Major offset: repositioning the junction box is often best handled by a qualified electrician.
How do you know the pendant is causing glare (and what’s the fastest fix)?
Yes—you’ll know glare is a problem if you see the bulb directly from your washing stance, you squint or avoid looking up, and the sink feels harsh even when it’s bright—so the fastest fix is usually a diffused shade or a dimmer.
- Switch to opal/diffused glass (or add a diffuser) to soften direct brightness.
- Add a dimmer and use dimmable LEDs for flexible control.
- Make a small height adjustment if the bulb sits in your direct line of sight.
What extra considerations matter after you’ve measured wall setback (glare, wet zones, and alternatives)?
After you’ve measured wall setback, 3 extra considerations matter most—glare management, moisture/splash exposure, and alternative fixtures—because they determine whether your lighting is comfortable daily and practical in tricky layouts.
To expand without losing focus, next we’ll compare window sinks, glare strategies, safety considerations, and alternatives that still look intentional.
If your sink is under a window, is a pendant the best choice or should you switch to recessed lighting?
A pendant wins for style, recessed lighting wins for keeping the window view unobstructed, and under-cabinet solutions win for invisible task lighting—so recessed (or low-profile) often performs best under a window unless the pendant is small and airy.
How do you reduce glare at eye level while keeping task lighting strong?
There are 4 reliable glare-reduction tactics—diffuse the shade, dim the output, redirect the beam, and reduce direct bulb visibility—so start with diffusion + dimming before changing placement.
- Choose opal/diffused glass instead of clear, especially at eye level.
- Add a dimmer with compatible dimmable LEDs.
- Avoid exposed bulbs where you can see filament/LED points directly.
- Use layered lighting so the pendant isn’t doing all the work.
Do you need special safety ratings for lights near a sink (splashes and moisture)?
Yes !you should consider splash and moisture exposure because water can shorten fixture lifespan, and some placements may require specific ratings depending on local rules and manufacturer instructions so verify product specs before final installation.
What are the best alternatives above a sink when wall setback is constrained?
There are 4 strong alternatives—recessed lights, wall sconces, under-cabinet LED tape, and track lighting—so choose based on whether your constraint is sightline, cabinet clearance, or a fixed junction location.
- Recessed lighting: clean ceiling look, no visual blockage.
- Wall sconces: style + side illumination when the sink is on a wall.
- Under-cabinet LED tape: excellent task light with zero hanging hardware.
- Track lighting: flexible aiming when perfect pendant placement isn’t possible.
Editorial note: Measurements in this guide are practical starting points. Always follow your fixture manufacturer’s instructions and consult a qualified electrician for electrical work or junction box relocation.
Source:
- https://steellightingco.com/wp-content/uploads/2021/04/Laurel-Matte-Black-and-White-Kitchen-Interior-StaceyAtHome-2.jpg
- https://classiccasualhome.com/wp-content/uploads/2018/11/circa-lighting-Limoges-pendant-1024×1024.jpg
- “https://steellightingco.com/wp-content/uploads/2022/11/AQw4M5q.jpeg
- https://classiccasualhome.com/wp-content/uploads/2018/11/circa-lighting-Limoges-pendant-1024×1024.jpg
Articles on the same topic:
-

Wiring 3 Pendants to One Junction Box: DIY Guide
-

Calculating Lumens for High Vaulted Ceilings
-

PILLAR: Ultimate Guide to Kitchen & Dining Lighting
-

When Were Chandeliers Invented? A Deep History of Luxury Lighting
-

How to Take LED Lights Off the Wall Without Damaging Your Walls
-

What Size Pendant Light for Living Room? Dimensions Height Guide