Buying a sofa is fun. Getting it stuck halfway up a staircase is… not. If you’re trying to figure out how to measure if furniture will fit up stairs, you’re in the right place. We’ll cover the real pain points people miss low ceilings, L-shaped turns, handrails, and even that chandelier you forgot was hanging right in the turning zone then give you a simple “fit calculator” and a visual 3D tape method so you can decide before delivery day.
Quick Summary (Read This First)
- Measure the tightest points, not the “average” stair: narrowest width (including handrails), lowest ceiling/overhead clearance, and smallest landing/turn space.
- Compare against the furniture’s smallest maneuverable dimension (often depth or diagonal depth for sofas), plus a clearance buffer.
- Most fails happen at: the first turn (L-shaped), top-of-stairs ceiling drop, handrail pinch points, and chandelier/light fixture zones.
- Fast rule of thumb: you generally want 1–1.5 inches of buffer per side for safe handling (more if the piece is delicate or the stair is steep).
- If you only need a quick “yes/no”: jump to Fit Calculator and Decision Tree.

What You’ll Need (5 Minutes of Prep)
- Tape measure (25 ft is ideal)
- Painter’s tape (or masking tape)
- Notepad/phone notes + camera
- Optional: cardboard (to mimic a sofa profile), level, and a helper
Take photos of each “pinch point” with the tape measure in the frame. When you’re comparing numbers later, those photos prevent “Wait… did we measure inside the rail or outside?” debates.
Measurement Checklist Table (Don’t Skip These)
Use this checklist as you measure the path from the curb (or garage) to the final room. If you’re hiring movers, this table is also the easiest thing to text/email them.
| What to Measure | Where to Measure | How to Measure (Quick Notes) | Write Your Number |
|---|---|---|---|
| Narrowest stair width | Between walls/handrails at the tightest point | Measure inside-to-inside. Include railings that intrude into the path. | _____ in |
| Handrail “pinch” width | Where rail brackets or newel posts narrow the path | Measure the tightest passable width at carrying height (not just at floor level). | _____ in |
| Ceiling/overhead clearance (lowest point) | Top of stairs, bottom of stairs, and above landings | Measure from step nosing edge up to ceiling/overhang. | _____ in |
| Landing depth | Each landing (especially at turns) | Depth = usable floor space from wall to edge before next flight. | _____ in |
| Landing width | Each landing | Width = usable space between walls/rails at landing level. | _____ in |
| L-shaped turn box | At each 90° turn | Measure both legs of the “L” (width of each corridor/stair run meeting at the corner). | Leg A _____ in / Leg B _____ in |
| Doorway width + height (if any) | Entry door, stairwell door, room door | Measure inside the frame; note hinges/trim that reduce usable width. | W ____ in / H ____ in |
| Chandelier / light fixture clearance | Over stairs/landing path | Measure lowest hanging point to floor; note fixture width that intrudes into turn space. | Drop ____ in / Width ____ in |
Step 1: Measure the Furniture (Including the “Pivot” Diagonal)
You need the usual dimensions width, height, depth—but stairs are all about how the piece pivots. For many sofas and sectionals, the make-or-break number is the diagonal depth (sometimes called “pivot depth”).
Furniture Dimensions to Record
- Width (W): left to right across the front
- Height (H): floor to highest point (including legs if they can’t be removed)
- Depth (D): front to back
- Diagonal depth (DD): diagonal from bottom-front to top-back (the “tilt” dimension)

Visual guide: Diagonal Depth (DD) is the “pivot” measurement that helps you angle a sofa around tight corners and up stairs. (Replace this image with your own diagram or branded illustration.)
How to Measure Diagonal Depth (DD) in 30 Seconds
- Stand the sofa as it would be carried (often slightly tilted).
- Find the bottom-front corner of the frame (not the cushion).
- Find the top-back corner (highest rigid point).
- Measure a straight line between those points and record it as DD.
Common mistake: measuring cushions instead of the frame. Cushions compress; frames don’t. Always measure the rigid “worst-case” outline.
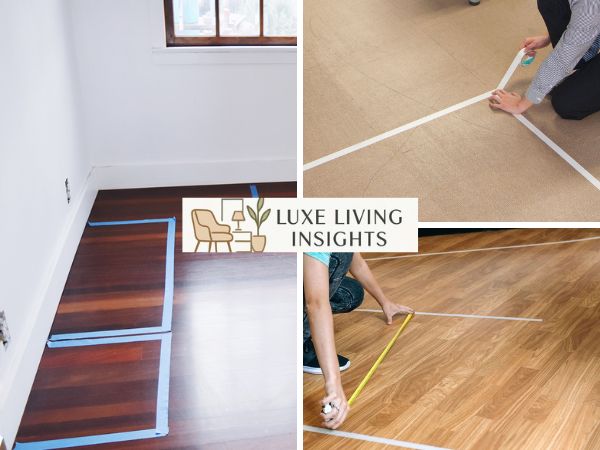
Mini “3D Tape” Preview (Before You Measure the House)
If you struggle to visualize size, tape the furniture footprint on your floor using painter’s tape:
- Mark W × D on the floor (rectangle).
- Put a vertical strip on a wall for H.
- Add a diagonal tape line on the wall to approximate DD (bottom-front to top-back).
This “3D cheat” makes it easier to spot problems like a low ceiling at the top of stairs or a handrail that steals an inch exactly where you need it.
Step 2: Measure the Stair Path (Width, Ceiling, Landings, Turns)
Competitors often focus on stair width—and yes, it matters—but real-world delivery fails usually happen when two constraints stack up: a tight turn plus a low ceiling, or a handrail pinch plus a chandelier hanging into the path.
2A) Stairway Width (Measure the Narrowest Point)
- Measure between walls or inside edges of handrails.
- Check multiple spots: bottom, middle, top, and at turns.
- Note any rail brackets/newel posts that reduce usable width at carrying height.
2B) Vertical Ceiling Clearance (Low Ceilings Are Sneaky)
Low ceilings are the silent furniture-killer especially at the top of the stairs where a ceiling might drop or a soffit crosses the landing. Measure:
- From the step nosing edge to the ceiling above it
- At the bottom, top, and any landing
- Under any overhangs, beams, duct bulkheads, or sloped ceilings
If you’ve ever bumped your head carrying a laundry basket upstairs, that’s your warning sign: you probably have a low clearance spot that matters for tall furniture pivots.
2C) Landings & L-Shaped Turns (Where Sofas Get Stuck)
For an L-shaped turn, you’re essentially trying to rotate a rectangle (your furniture) through a corner “box.” Record:
- Landing depth (usable floor space)
- Landing width (usable space between walls/rails)
- The two legs of the “L” (hall/stair widths meeting at the corner)

Quick check: If your landing is shallow and your sofa is deep, you’ll rely heavily on diagonal depth and careful pivoting—meaning you need extra buffer.
2D) Handrails (They “Steal” Space Exactly Where You Need It)
Handrails don’t just reduce width—they can force the item outward, changing your angle during the pivot.
- Measure width at mid-body height (where the furniture actually passes)
- Note protruding brackets and newel posts
- If removable, record “rail on” and “rail off” widths separately
2E) Chandeliers & Light Fixtures (Overhead + Side Intrusion)
Chandeliers can interfere two ways: their drop height reduces overhead clearance, and their width can intrude into a turn.
- Measure from the lowest point of the fixture to the floor/landing
- Measure how far the fixture extends into the path
- If in doubt, plan to remove the shade/fixture temporarily before delivery
Fit Calculator (Simple, Real-World Version)
This isn’t a fancy app it’s the exact math movers use as a quick filter. You’ll compare your smallest passable stair dimensions to the furniture’s maneuverable dimensions, with a buffer for hands, gloves, and protecting walls.
Step 1: Pick Your Clearance Buffer
- Standard buffer: 1–1.5 inches per side (2–3 inches total)
- Safer buffer: 2 inches per side (4 inches total) for fragile finishes, tight turns, or heavy items
Step 2: Compare Stair Width to Furniture “Pass Dimensions”
Identify your narrowest usable stair width (including handrail pinch points). Then check whether it exceeds at least one of the furniture’s pass dimensions:
- Stair width ≥ D + total buffer (carrying straight)
- OR stair width ≥ DD + total buffer (pivoting around corners)
- OR stair width ≥ H + total buffer (standing it up, sometimes used for narrow halls)
Reality check: If stair width is tight, you may still succeed if your landing/turn space is generous. If width is generous but the landing is tiny, you can still fail.
Step 3: Check the Turn “Box” (Landing + Low Ceiling Combo)
At the tightest turn, ask:
- Is the landing depth at least the furniture’s depth (D) (plus buffer) if you need to rest/rotate?
- Is the lowest overhead clearance greater than the furniture’s height (H) when tilted/pivoted?
If overhead clearance is the issue, removable legs, feet, or a detachable back can be the difference between “no chance” and “easy win.”
Quick “Pass/Fail” Worksheet
- Narrowest stair width (usable): _____ in
- Total buffer (both sides): _____ in
- Furniture depth (D): _____ in
- Furniture diagonal depth (DD): _____ in
- Furniture height (H): _____ in
- Lowest overhead clearance: _____ in
- Smallest landing depth: _____ in
Decision Tree: Will It Fit Up the Stairs?
Use this as your fast, scannable path to a confident yes/no.
- Is the narrowest stair width at least (smallest of D, DD, or H) + buffer?
- If no → High risk. Consider disassembly, alternate entry, or professional movers with straps.
- If yes → Continue.
- Do you have an L-shaped turn or tight landing?
- If no → You’re mostly checking width + overhead clearance. Continue to step 4.
- If yes → Continue to step 3.
- At the tightest turn, do landing dimensions allow rotation?
- If no → Plan pivot strategy (diagonal) or partial disassembly (legs/arms/back) before delivery.
- If yes → Continue.
- Is the lowest overhead clearance greater than your tallest pivot posture?
- If no → Low ceiling risk. Remove legs/feet, tilt earlier, or remove chandelier/fixture temporarily.
- If yes → Continue.
- Any obstacles that reduce space at carrying height? (handrail brackets, newel posts, light fixtures)
- If yes → Re-measure at the exact pinch points and increase buffer.
- If no → You likely have a workable path.
When to stop measuring: If you find a single hard constraint where your narrowest width is smaller than every pass dimension (D, DD, and H) even before adding buffer, it’s time to switch to Plan B (disassembly/alternate entry) instead of collecting more numbers.
“3D Guide” You Can Do at Home: Tape + Cardboard Simulation
Numbers are necessary, but the most confident decision comes from a quick physical simulation—especially for L-shaped turns.
Option A: Painter’s Tape Walkthrough (Fastest)
- Use tape to mark the furniture’s width and depth on the floor.
- At the landing/turn area, tape out the usable turn box (your landing width × landing depth).
- Try to “rotate” your taped rectangle through the turn box.
- If you keep hitting tape, you’ll need diagonal pivoting, extra buffer, or disassembly.
Option B: Cardboard Profile (More Realistic)
- Cut cardboard to match the furniture’s depth (D) and height (H).
- Mark the diagonal depth (DD) line across it.
- Walk it through the stairs/landing while a helper watches pinch points.
If the cardboard barely clears, the real piece will feel tighter because of hand placement, protective blankets, and fatigue halfway up the stairs.
Fitting Techniques Movers Use (Without Being Reckless)
The “Pivot” Using Diagonal Depth
If a sofa won’t go straight, you angle it so the diagonal becomes the effective “pass dimension.” This is why DD often predicts success better than depth alone.
Clearance Buffer That Actually Works
Give yourself room for hands and control. Even if the furniture can technically fit with a paper-thin gap, the risk of wall damage (and finger injury) spikes fast.
Remove What’s Easy Before You Try
- Take off legs/feet (common win for low ceiling turns)
- Remove cushions and loose back pillows
- If designed for it, detach the back/arms (many sectionals allow partial breakdown)
- Temporarily remove a chandelier shade or lower the fixture if it intrudes into the turning space
- Don’t “muscle it.” If you feel the piece binding, stop. That’s when injuries and broken banisters happen.
- Protect the path: corner guards, blankets, or cardboard on walls and rails.
- Use proper grip: lifting straps can reduce strain and give more control on steep stairs.
- Mind the chandelier: if the fixture is in the carry path, remove or secure it first. One bump can mean shattered glass.
- Know your limit: heavy items on stairs are a top-tier risk. If in doubt, hire insured movers.
Troubleshooting: Why It “Should Fit” But Doesn’t
1. The stair width seems fine, but the sofa won’t turn at the landing
- Likely cause: landing depth is too small for rotation, or handrails shrink usable space at the pivot point.
- Fix: rely on diagonal depth, remove legs, rotate earlier/later, or use straps for tighter control.
2. It hits the ceiling at the top of the stairs
- Likely cause: ceiling drop/soffit reduces clearance during the final pivot.
- Fix: remove legs/feet, change the tilt angle sooner, or temporarily remove overhead obstacles (including chandeliers in the zone).
3. You measured the stair width, but it still binds halfway up
- Likely cause: you measured wall-to-wall but missed handrail brackets or a newel post pinch point.
- Fix: re-measure at carrying height and use the smallest number, not the average.
4. Doorway trim/hinges are stealing “just enough” space to fail
- Likely cause: measuring outside the doorframe instead of inside.
- Fix: measure inside the frame; consider removing the door from hinges temporarily for extra clearance.
5. Sectional pieces fit individually, but not as a set
- Likely cause: you’re trying to move a connected unit or a large corner piece without separating it.
- Fix: break into smallest components; label hardware and take photos for reassembly.
FAQs
How do I measure if furniture will fit up stairs?
- Measure the narrowest usable stair width (including handrails), the lowest overhead clearance, and the smallest landing/turn space. Compare those to your furniture’s depth, height, and especially diagonal depth, then add a safety buffer (usually 2–3 inches total).
What’s the most important sofa measurement for tight stairs?
- Often it’s diagonal depth (DD), because that’s the “pivot” dimension when you angle the sofa around corners. Depth alone can be misleading if you can tilt the piece.
How much clearance should I leave?
- A practical buffer is 1–1.5 inches per side (2–3 inches total). Go larger for fragile finishes, steep stairs, or tight L-shaped turns where control matters more than “technical fit.”
Do handrails really make that big a difference?
- Yes. Rails and brackets can reduce width at the exact height your furniture passes, and they can force the item outward, changing your pivot angle at corners.
What should I do about a chandelier in the stairwell?
- Treat it as a real obstacle. Measure both the drop (lowest point to floor) and whether it intrudes into the turn. If it’s in the carry path, remove shades or temporarily take it down before delivery.
When should I hire professional movers?
- If the piece is heavy, the stairs are steep, there’s a tight L-turn, or your measurements leave less than a couple inches of buffer. Pros have straps, corner protection, and experience pivoting safely without damaging walls—or you.
Articles on the same topic:
-

How to Get Water Stains Out of Fabric Chairs
-

Pendant Light Over Kitchen Sink Height
-

How Much Does It Cost to Install 4 Recessed Lights? (2026 Price Guide)
-

How Many Pendant Lights Over a 9-Foot Island? The Designer’s Sizing & Spacing Guide
-

Choose Rattan Wicker Outdoor Furniture That Lasts
-

15 Decorating Ideas for a Feng Shui Bathroom That Boost Chi