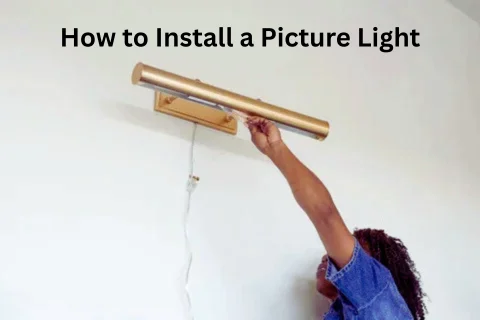
Installing a picture light is easiest when you treat it like a three-part job: mount it at the right height, aim it at the right angle, and choose the right wiring method for your wall and lifestyle. To begin, this guide walks you through each decision with clear steps.
Next, you’ll learn how picture lights differ from sconces and track lighting, plus how to choose the correct fixture size so your artwork is evenly lit instead of “spotty” or dim at the edges.
After that, we’ll cover the two details that make or break the final look: the exact mounting height and the tilt/angle that minimizes glare especially important for glass-covered frames and glossy prints.
Below, you’ll get a practical installation workflow (for drywall, plaster, and brick), then a wiring decision guide hardwired vs plug-in vs battery so you can finish your project safely and confidently.
What is a picture light, and how is it different from a wall sconce or track lighting?
A picture light is a purpose-built wall fixture designed to wash light across artwork from above, while wall sconces primarily add ambient light and track lighting uses adjustable heads to aim light from a rail so picture lights specialize in “even coverage” and a gallery-style look.
To connect this definition to real choices, think in terms of outcomes: picture lights highlight a single piece, sconces support the whole room, and track systems give flexibility when you have multiple pieces or changing displays.
Is a picture light the same as an art light?
Yes, a picture light is commonly the same thing as an art light for three reasons: (1) both are meant to illuminate artwork from above, (2) both use a similar mounting bracket and shade/head design, and (3) retailers and designers use the terms interchangeably when describing “gallery lighting.”
To avoid confusion when shopping, look for the function in the product description coverage for artwork rather than relying on the label alone. In other words, “picture light,” “art light,” and “gallery lamp” often describe the same category.
Picture light vs track lighting: which gives more even coverage?
Picture lights win for single-piece evenness, track lighting is better for multi-piece flexibility, and recessed/spot solutions are best for minimalist ceilings because a long picture-light head spreads illumination across the frame instead of creating multiple overlapping hot spots.
To choose quickly, match the system to your display:
- Choose a picture light if you want one hero piece to feel intentional and elevated.
- Choose track lighting if you have a gallery wall, rotating art, or multiple pieces along one corridor.
- Choose recessed/spot if you must keep the wall visually clean and the ceiling can do the work.
What size picture light do you need for your artwork width and frame style?
There are 3 practical sizing approaches for picture lights half-width, two-thirds-width, and three-quarters-width grouped by how much coverage and “presence” you want, and the right choice depends on artwork size, frame depth, and whether the piece sits behind glass.
Next, you’ll translate “looks right” into measurable rules. That matters because a fixture that’s too short creates dark edges, while a fixture that’s too long can look heavy and may produce an overly bright wash on small art.

How long should a picture light be compared to the artwork width?
A picture light is typically narrower than the artwork and often works best at about one-half to two-thirds of the artwork’s width because this ratio balances coverage with visual proportion and avoids a “bar is wider than the frame” look.
To apply this without overthinking, follow a simple sizing workflow:
- Measure the visible artwork width (or the outer frame width if the frame is part of the design).
- Pick a target ratio: 1/2 for small pieces, 2/3 for medium-to-large pieces, up to 3/4 when the art is large or the wall is dim.
- Check beam behavior: tighter beams need a little more length; wide beams can work with slightly shorter fixtures.
Practical tip: if your art is in a very dark hallway, sizing toward the upper end of that range often looks more “gallery-like” and less underpowered.
Do you need a different picture light for framed canvas vs glass-covered art?
Yes, you often want a different picture light setup for canvas versus glass for three reasons: (1) glass reflects hotspots and room light more easily, (2) glossy surfaces show glare at smaller angle changes, and (3) deeper frames can cast shadows if the light is too close.
To handle each surface type well:
- Canvas or matte prints: you can use a slightly tighter beam or a closer mount because glare is minimal and texture can look beautiful under directional light.
- Glass-covered art: favor a wider, softer beam and be ready to micro-adjust the tilt to minimize reflections from windows and overhead lights.
- Deep shadowbox frames: consider a light with better projection and mount slightly higher to avoid frame-lip shadows.
Where should you mount a picture light (height and centering) for the best result?
Mount a picture light by aligning it to the artwork’s centerline and placing it at a consistent “sweet spot” above the frame then adjusting slightly for large art because correct height and centering create the even wash that makes art look intentional.
To begin, treat mounting like a measuring problem (not a guessing problem). You’ll mark a center point, choose a starting height, and do a quick “stand-back test” before you drill.

How high above a painting should you place a picture light?
A common starting point is to place the picture light about 6–7 inches above the top of the frame, then adjust up slightly for larger pieces because this distance tends to wash light evenly without turning the top edge into an over-bright hotspot.
To dial this in for your room, use a quick calibration method:
- Start at the baseline height (your “default” above the frame).
- Turn the light on and step back to typical viewing distance (across the room, not right under it).
- Look for two signals: bright glare at the top (too low or too steep), or dim lower corners (too high or not enough projection).
- Adjust in small moves (¼–½ inch) until the light feels even.
If your ceiling is low or the art is very tall, you can still use the same logic: start with a consistent “default,” then refine based on how the light lands on the piece.
Should a picture light be centered on the frame or on the wall?
Yes, you should usually center a picture light on the frame for three reasons: (1) it aligns the beam with the artwork’s visual weight, (2) it prevents uneven side shadows, and (3) it looks “gallery correct” at first glance.
However, there are exceptions especially on gallery walls or asymmetrical compositions. In those cases, centering “on the wall” can work if the light is meant to serve a grouping rather than a single frame. The rule is simple: center to what the light is meant to highlight.
To decide in 20 seconds:
- Single artwork: center on the frame.
- Two pieces as a pair: center between them only if one light is intended to cover both (rare, but possible with wide distribution).
- Gallery wall: use track or multiple lights instead of forcing one picture light to do everything.
How do you set the angle/tilt to reduce glare and evenly light the art?
Set the picture light angle by aiming for an even “wash” across the artwork while minimizing reflections then fine-tuning in small increments because glare comes from the wrong tilt more often than from the wrong bulb.
Next, you’ll use a repeatable test: turn the light on, view from normal standing positions, and adjust until bright reflections disappear and the lower portion of the art is still clearly illuminated.
What angle should a picture light be tilted to avoid reflections?
The best tilt is the one that removes visible hotspots from your normal viewing position while keeping the entire artwork readable because reflections depend on where you stand, where windows are, and whether the frame has glass.
To set the tilt reliably, follow this practical sequence:
- Start slightly downward (a gentle tilt, not a steep spotlight).
- Stand where you naturally view the art (entry point, sofa, dining chair).
- Scan for glare bright reflections that obscure details or mirror a window.
- Adjust in micro-steps (a few degrees at a time), retesting after each change.
- Confirm coverage by looking at the lower third of the art; if it’s dim, you may need a slightly less steep angle or a higher mount.
Quick clue: if the top edge is very bright but the bottom is dull, your angle is likely too steep or the fixture is too close to the frame.
Does a tighter beam or wider beam work better for textured canvas?
A tighter beam wins for texture drama, a wider beam is best for even readability, and a medium spread is ideal for most homes because textured canvas can look stunning with directional light, but too narrow a beam can create harsh hotspots.
To match beam style to art type:
- Heavily textured canvas: medium beam with careful tilt gives dimension without harsh glare.
- Fine art prints: wider, softer beam reduces hotspots and keeps colors consistent.
- Glossy photography: prioritize glare reduction first (wide beam + conservative tilt).
If you can dim the light, you gain extra control: you can keep a wider beam for coverage and reduce intensity to avoid a “spotlight” look.
How do you install a picture light step-by-step (mounting hardware and wall type)?
Install a picture light with a simple workflow measure, mark, drill, anchor, mount the bracket, attach the fixture, then test because most picture lights use a standard backplate system and succeed or fail based on accurate marking and proper anchors.
To keep the process safe, treat this like two projects in one: first a secure mount (the wall work), then power (hardwired or corded). If you’re hardwiring and you’re not confident with electrical work, hiring a licensed electrician is the smart call.

Step-by-step install checklist (works for most fixtures):
- Turn power off at the breaker if hardwiring (verify power is off before touching wires).
- Measure and mark the artwork centerline and your target height above the frame.
- Hold the bracket/backplate at the marks and level it; mark hole positions.
- Drill pilot holes for your wall type (drywall/plaster/brick), then insert anchors if needed.
- Secure the bracket firmly; it should not wiggle.
- Attach the fixture to the bracket (usually screws from the top/bottom or side set screws).
- Set initial tilt, install bulb/confirm LED function, and test for even wash.
- Refine height/angle only if needed; small adjustments create big visual improvements.
Can you install a picture light without drilling into studs?
Yes, you can install many picture lights without studs for three reasons: (1) most picture lights are relatively lightweight, (2) modern drywall anchors can hold stable loads when installed correctly, and (3) picture lights don’t experience the same dynamic forces as shelves or TV mounts.
However, if your fixture is heavy, oversized, or mounted on a wall that gets bumped (tight hallway), securing into a stud can add peace of mind. The practical rule: if the bracket feels “too small for the weight,” upgrade the fastening method.
To make anchor installs more reliable:
- Use the right anchor type for your wall (toggle anchors for hollow drywall; masonry anchors for brick).
- Do not overtighten, which can crush drywall and reduce holding power.
- Confirm stability before you attach the fixture head no wiggle should remain.
Drywall vs plaster vs brick: what anchors and drill bits should you use?
Drywall wins with hollow-wall anchors, plaster works best with careful pilot drilling and appropriate anchors, and brick requires masonry bits and masonry anchors because each surface responds differently to drilling and screw pressure.
To choose quickly, match the wall to the hardware:
- Drywall (no stud): toggle bolts or quality hollow-wall anchors; standard drill bit for pilot holes.
- Drywall (with stud): wood screws into stud; pilot hole helps prevent splitting.
- Plaster: drill slowly (plaster can crack); use anchors rated for plaster/lath where necessary.
- Brick or masonry: masonry drill bit + masonry anchors; keep dust cleared for a tight fit.
Practical tip: if you’re unsure what you’re drilling into, start with a small pilot hole and pay attention to the dust and resistance this often reveals whether you’re in drywall, plaster, or masonry.
What wiring option should you choose: hardwired vs plug-in vs battery picture lights?
Hardwired is best for a clean, permanent look, plug-in is best for flexible placement, and battery is best for no-wiring convenience because wiring choice directly affects installation difficulty, brightness consistency, cord visibility, and long-term maintenance.
Next, you’ll pick the wiring method by your real constraints: renter rules, wall access, existing electrical boxes, and how “invisible” you want the setup to feel.

| Option | Best for | Pros | Cons |
|---|---|---|---|
| Hardwired | Homeowners, permanent installs | Cleanest look; no visible cord; can integrate dimmers | Most complex; may require electrician; depends on electrical box location |
| Plug-in | Renters, easy upgrades | Fast install; flexible placement; easy to replace | Cord must be managed; outlet location matters |
| Battery | Zero-wiring situations | No outlet needed; easiest install; great for temporary or small pieces | Battery charging/replacement; brightness may be lower; frequent use = more maintenance |
Is hardwiring necessary for a picture light?
No, hardwiring is not necessary for many picture lights for three reasons: (1) plug-in options can look professional with cord covers, (2) battery lights solve “no outlet” walls quickly, and (3) many people prioritize flexibility over permanence especially in rentals or frequently updated spaces.
However, if the artwork is a long-term focal point (fireplace mantle, formal dining, gallery hallway), hardwiring can be worth it because it removes visual noise and makes the lighting feel architecturally integrated.
Plug-in vs battery picture lights: which is best for renters?
Plug-in wins for brightness and reliability, battery is best for no-cord convenience, and hardwired is ideal for permanent, high-end finish because renters usually need reversible solutions that still look intentional.
To choose based on renter realities:
- Choose plug-in if you have a nearby outlet and want consistent brightness for larger art or daily use.
- Choose battery if cord routing would look messy or the wall is far from outlets (great for small-to-medium pieces).
- Choose hardwired only if your lease allows it and you plan to stay long-term (or you’re working with a landlord-approved electrician).
What are the most common picture light mistakes (wrong height, wrong size, glare) and how do you fix them?
The most common mistakes are (1) mounting too close to the frame, (2) choosing a fixture that’s too short, (3) aiming too steeply, (4) using the wrong bulb temperature, and (5) ignoring cord management and each one has a fast fix that doesn’t require starting over.
To troubleshoot quickly, use this “symptom → fix” checklist:
- Top is too bright, bottom is dim: reduce tilt, mount slightly higher, or choose a wider beam.
- Edges are dark: choose a longer fixture or improve beam spread/brightness.
- Glare mirrors windows: adjust tilt in small steps and test from normal viewing spots; consider softer/wider distribution.
- Art looks yellow or cold: adjust color temperature to better match the room and artwork palette.
- Cord ruins the look: route straight and hide with paintable covers; minimize visible slack.
Summary: if you fix height, size, and angle first, everything else becomes easier because those three variables control most of what your eye perceives as “professional.”
Tip: If you’re working with hardwired connections and you’re not experienced with household electrical work, consider a licensed electrician for safety and code compliance.
Source:
- https://prettyonfridays.com/wp-content/uploads/2022/01/Gallery-wall-front-angle.jpg
- https://images.unsplash.com/photo-1519710164239-da123dc03ef4?auto=format&fit=crop&w=1600&q=70
- https://st.hzcdn.com/simgs/c7f121b0068de8ed_14-8518/_.jpg
- https://m.media-amazon.com/images/I/51nPcguATzL._AC_UF1000,1000_QL80_.jpg